For the third year I’m teaching an adult class at our church, and I’m finding it helpful to use the free / open-source software program “Handbrake” to create short clips of videos we’re using in lessons from a DVD. It’s a bit tricky to select the correct options within the program to “burn in” the English subtitles to an exported clip, so I’m sharing this post both for myself (to speed my own process of remembering / re-learning how to do this) as well as help others. As always, it’s important to keep local copyright law in mind as well as fair-use provisions of copyright law, which we fortunately have here in the United States.
Step 1: After you download Handbrake, install it, and open the SOURCE (the “video_ts” folder on your DVD video) you’ll want to navigate to the SUBTITLES tab. Under the TRACKS popup menu, select ADD ALL TRACKS.
Steps 2 and 3: Be sure ONLY the checkbox next to the subtitle language you want (in my case, “English”) is selected in the TRACKS window. Then click the button for SELECTION BEHAVIOR above.

“Handbrake Subtitles: Steps 2 & 3” (CC BY 2.0) by Wesley Fryer
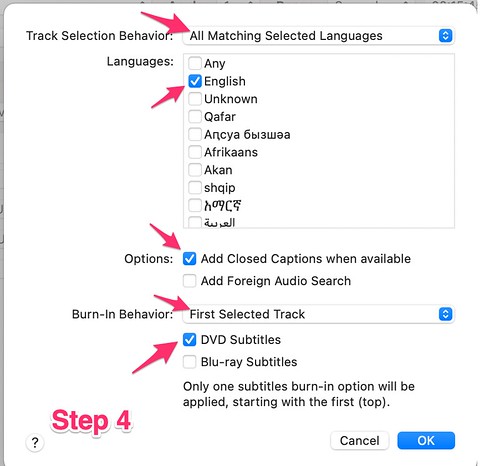
Step 4: Select the following:
- ALL MATCHING SELECTED LANGUAGES in the top drop down menu
- Tick the box for your desired subtitle language (“English.”)
- Under OPTIONS, only select ADD CLOSE CAPTIONS WHEN AVAILABLE.
- By BURN-IN BEHAVIOR select FIRST SELECTED TRACK.
- Tick the box by DVD Subtitles.

“Handbrake Subtitles: Step 4” (CC BY 2.0) by Wesley Fryer
I had to experiment with different settings about six different times to get this to work… So hopefully these steps will save both me and you time when trying this again for the first time!

“DVD Subtitles with Handbrake” (CC BY 2.0) by Wesley Fryer
If you enjoyed this post and found it useful, subscribe to Wes’ free newsletter. Check out Wes’ video tutorial library, “Playing with Media.” Information about more ways to learn with Dr. Wesley Fryer are available on wesfryer.com/after.
Source : DVD Subtitles with Handbrake


